An active dimension plane is used to orient PMI dimensions and annotations in the 3D model. You can make a different plane “active” without affecting the positions of existing PMI dimensions and annotations:
For ordered portions of parts, at any time before or while annotating the model
For synchronous portions of parts, while annotating the model.
The currently active dimension plane is displayed in half-highlight. The default color is red-brown.
When you are adding dimensions and annotations to the model, you can change the default plane to which the PMI elements are placed parallel using the Lock Dimension Plane option on the command bar. You can turn this plane off again at any time.
Choose the PMI tab→Tools group→Lock Plane command  .
.
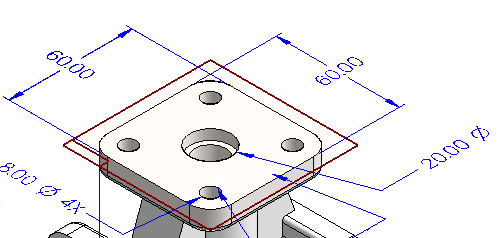
The currently active dimension plane is displayed in red-brown highlight. The default active plane is the (XY) plane, in this example, Top
Tip:
You also can click the Lock Dimension Plane button on the command bar when you are placing a 3D dimension or annotation.
On the Lock Dimension Plane command bar, from the Create-From Options list, select the method you want to use to define the active dimension plane.
Follow the prompts displayed in PromptBar to define where you want the dimension plane to be.
Example:
The default creation method is 'Coincident Plane.' If you use this option, you can click a model face, and a plane coincident to that face will be activated.
Tip:
The active plane is displayed in red-brown half-highlight the next time you select a PMI dimension or annotation command.
Select any PMI dimension or annotation command and place it; it will be aligned parallel to the active plane.
Tip:
When you are done placing PMI elements using the current dimension plane, press F3 to turn it off.
Note:
For synchronous models you must select an existing plane...if you wish to use a reference plane, please refer to Reference Planes for more information.
Select any PMI dimension or annotation command. Click the Lock Dimension Plane button on the command bar.
The currently active dimension plane is displayed in red-brown highlight. The default active plane is the (XY) plane, in this example, Top.
Tip:
When you are done placing PMI elements using the current dimension plane, press F3 to turn it off.
Select a reference plane or face.
Choose the PMI tab→Tools group→Lock Plane command .
Do one of the following:
For an active part, do one of the following:
Select a face.
Select a reference plane. If one does not exist, select the method you want to use to define the active dimension plane from the Create-From Options list on the Lock Dimension Plane command bar.
For an inactive part, do the following:
On the Lock Dimension Plane command bar, click Activate Part.
Select the part.
Select a face or reference plane.
Tip:
As for an active part, you can create a reference plane using the Create-From Options list on the Lock Dimension Plane command bar.
Tip:
The active plane is displayed in red-brown half-highlight the next time you select a PMI dimension or annotation command.
Continue by placing the dimension or annotation.
Tip:
When you are done placing PMI elements using the current dimension plane, press F3 to turn it off.