You can use the steering wheel to move or rotate model geometry. Both workflows are explained in this topic.
Choose Home tab→Select group→Select.

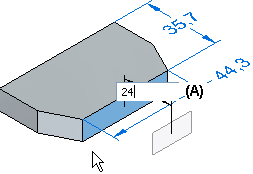
Position the cursor over the face you want to move, and when it highlights, left-click to select it.

The primary axis and origin of the steering wheel handle (A) display. Any dimensions that are attached to the face also display.

Position the cursor over the primary axis on the steering wheel, and click to select it.

Specify the extent of the move. Do one of the following:
Move the cursor until the face is positioned approximately where you want it, then click.

To define the extent precisely, type a value in the Dynamic Input Control box (A), then press the Enter key.
Choose Home tab→Select group→Select.
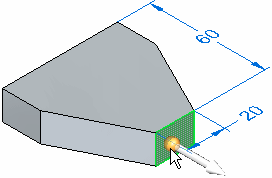
Position the cursor over the face you want to rotate, and when it highlights, left-click to select it.

The primary axis and origin of the steering wheel handle display.

Position the cursor over the origin on the steering wheel, and click to select it. The steering wheel is attached to the cursor.
Position the cursor over a linear model edge that defines the rotation axis for the face you want to rotate. When the edge highlights, and the steering wheel aligns itself properly, click to position the steering wheel.

Position the cursor over the torus on the steering wheel, and click to select it.

Specify the extent of the rotation. Do one of the following:
Move the cursor until the face is positioned where you want it, then click.
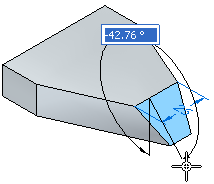
To define the rotation extent precisely, type a value in the Dynamic Input Control box (A), then press the Enter key.

Tip:
To rotate selections properly, the primary axis on the steering wheel must be aligned with the rotation axis you want. You can position the steering wheel using linear edges, cylindrical faces, sketch elements, and so forth.
You can also use the Keypoints option on the Move command bar to specify a keypoint type, then select a keypoint on the model to define the extent of the move or rotate operation.
You can use the Connected Faces options on the Move command bar to control how the adjacent faces react to the move or rotate operation.
You can use the Live Rules options to control how the model reacts to the move or rotate operation.