As you develop the design concepts for a new assembly, it can be useful to draw sketches in an assembly document. You can draw a sketch on a principal plane of the base coordinate system, a planar face on a part in the assembly, or a reference plane.
Sketching in a synchronous assembly works in much the same manner as sketching in a synchronous part. This Help topic will focus on the areas where sketching in an assembly differs from sketching in a part.
Note:
For more information about sketching in synchronous parts, see Drawing sketches of parts.
You can use the commands on the Sketching tab in the Assembly environment to draw, dimension, and constrain sketch elements.
You can set style, color, type, and width options for the 2D elements to make it easier to interpret the assembly sketch.
You can add dimensions and relationships to control the position and size of the sketches. You can also define functional relationships using the Variables command.
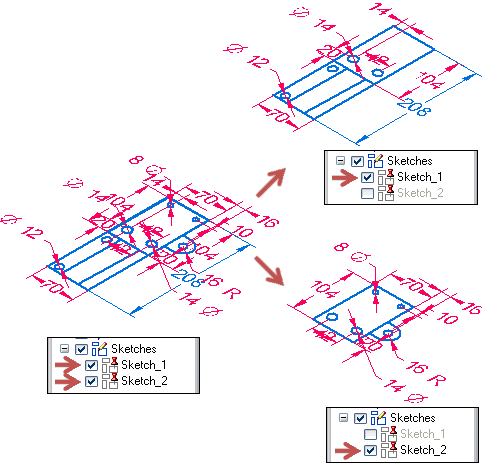
You can use the PathFinder shortcut menu commands to control the display of the sketch elements, lock and unlock the sketch plane, and specify whether a sketch is considered permanent or nonpermanent.
You can use the Merge with Coplanar Sketches command on the shortcut menu when a sketch is selected to specify whether a sketch can be combined with another coplanar sketch. Specifying that a sketch is nonmergable makes it possible to create multiple sketches on the same plane in space. Also, a nonmergable sketch will not merge with another sketch if the two sketches become coplanar during a move operation. This is useful when you create assembly layout sketches where each sketch represents a unique part in the assembly. Nonmergable sketches makes it possible to show, hide, or move a set of sketch elements easily.
For more information on mergable and nonmergable sketches, see Working with combinable sketches.
When you create or modify a part or subassembly in the context of the assembly, you can use your assembly sketches to construct part sketches.
You can use the Project to Sketch command to copy assembly sketch geometry into a part or subassembly document. The sketch geometry you copy is non-associative.
You can also use the Project to Sketch command to copy part edges into an assembly sketch. The sketch elements are non-associative to the edge on the part. You cannot use the Project to Sketch command to copy edges from one part into another part from the assembly.
You can control the position of parts and subassemblies with respect to an assembly sketch. You can position 3D components using assembly relationships, such as connect, to connect a vertex on a part edge to a vertex on an assembly sketch element. Later, you can edit the size and position of the assembly sketch to move the part.
Sketch region functionality is not available in a synchronous assembly.