After you create a part view, you can use it to create a section view. A section view displays a cross section of the 3D part or assembly model. Sectioned areas are automatically filled.
You can create section views with the Section View command and the Broken-Out command.
Before you can create a section view with the Section View command, you must create a cutting plane on the part view you want to use as the basis for the section view using the Cutting Plane command.
You can use the Broken-Out command to create a broken-out section view of internal regions to a depth you define. This allows you to expose interior features of a part so you can document them. With the Broken-Out command you draw the profile within the command.
When you click the Cutting Plane button you are prompted to select a part view. This can be any orthographic, auxiliary, or detail view on the drawing.
Auxiliary views often show the part at the optimal orientation for making the section cut. A detail view can be useful for creating sections due to its scale.
Sections created from detail views inherit the same scale as the detail view.
When you select the Section View command, you are prompted to select a cutting plane. After you select the cutting plane, a rectangle the size of the section view you are going to place is displayed on the cursor. Also, options on the command bar are activated that allow you to specify the type of section view you want to create. When you position the view and click, the section view is created so that it is aligned with the cutting plane.
Note:
The view direction of the section view is defined by the cutting plane. The side on which you place the view, relative to the cutting plane, has no effect on view direction.
You can control caption display and formatting separately for the section view and for the cutting plane on the drawing. You can:
Show and hide caption text using the Show Caption button on the command bar.
Reposition a caption by selecting a drawing view and then dragging its caption to a new location.
Select a cutting plane, and then use the Caption tab (Viewing Plane, Detail Envelope, Cutting Plane Properties dialog box) to change the content and formatting of the cutting plane caption.
Select a section view, and then use the Caption tab (Drawing View Properties dialog box) to change the content and formatting of the section view caption.
The default content and appearance of section view captions, cutting plane captions, and cutting plane lines is defined in the Drawing View style that is applied to the view.
Example:
You can use the Caption Format tab (Drawing View Style dialog box) to:
Specify the default location of the section view caption (above or below the drawing view).
Specify the default location of the cutting plane caption in relation to the cutting plane line and terminator.
Caption text placement using the Direction Line Open End option

You can set style options in your custom draft templates to make it easier to create captions that automatically conform to your standards. For more information, see the following Help topics:
When you place a section view, you can use the Section View command bar to select a fill style to define the pattern displayed in the sectioned areas of the part. You also can specify the spacing and angle of the fill area when you place the section view.
After the view is created, you can change the fill style, hatch spacing, and hatch angle on cut faces using options on the Display tab (Drawing View Properties dialog box). You can do this for one or more parts selected in the Parts list on the Display tab.

You also can control hatching on cut ribs in a section view, and you can use the Draw In View command to edit the individual hatch lines. See Modifying section views, below, to learn about these options.
If you want more control over the properties of the fill pattern, you can create a new hatch style, and then use the hatch style to define a new fill style. Hatch styles enable you to define color, line width, spacing, and angle properties to apply to a pattern. You can use the following options on the Edge Display tab (Solid Edge Options dialog box) to select the fill style to apply to newly created section views, and to specify whether the hatching on individual parts can be different from the default style:
Show Fill style in section view
Derive from part
Automatically alternate hatch spacing in section views
Automatically alternate hatch angle in section views
On certain types of parts you can create a revolved section view to more accurately view the features on the part. You can do this by selecting a cutting plane consisting of two or more lines, and then selecting the Revolved Section View option on the command bar.

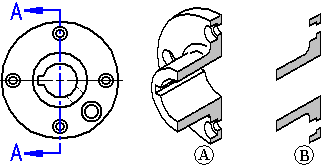
To create a section view that does not include the geometry behind it, use the Section Only button on the command bar. This option creates a section view where only the thin slice of geometry that intersects the cutting plane is displayed. The geometry that is beyond the cutting plane is not processed or displayed. For example, you can create a section view of a part in which the keyway feature is not displayed.
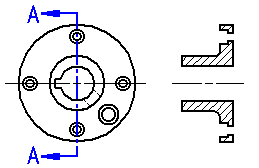
To further illustrate this, if you were to rotate a typical section view and a Section Only section view, you would see half of the part with a typical section view (A), but only a thin slice of the part with a Section Only section view (B).
This option is useful when creating sections of complex parts and assemblies where displaying the geometry behind the cutting plane would be confusing or unnecessary. Section views placed with the Section Only option also process faster than standard section views.
You can also create a revolved section view using the Section Only option.

To learn how, see Create a thin section view.
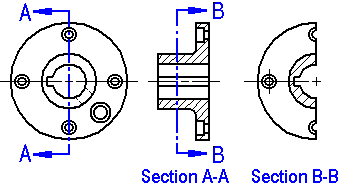
When working with a large or complex assembly, the processing time improvement with the Section Only option can be significant because fewer parts are processed. For example, in Section A-A below, all the parts beyond the cutting plane must be processed in a standard section view, but when you set the Section Only option for Section B-B, only the parts that are intersected by the cutting plane line are processed.

Note:
You cannot create additional section views from a Section Only section view.
You can also create a new section view from an existing section view.
When you create a new section view from an existing section view, you can use the Section Only and Section Full Model options on the command bar to control the appearance of the new section view. For example, when you create the new section view B-B using Section A-A as the source view, there are four output options:
|
The Section Only and Section Full Model options are cleared |
The Section Only option is set |
|
The Section Full Model option is set |
The Section Only and Section Full Model options are set |
The Section Only and Section Full Model options are only available when you create a section view. You cannot change these options when you modify an existing section view.
For assemblies, you can specify which parts you want to section by using the Model Display Settings button on the Section View command bar. After the section view is created, you can change these settings by editing the properties of the section view.
The fill angle you specify for the section view is rotated 90 degrees for each sectioned part. After the section view is created, you can edit the fill and apply different styles and overrides.
You can modify the placement and alignment of the section view directly on the drawing sheet. To modify the section view's position, click and drag the view.
You can use the Hatch ribs in section views option on the Advanced tab (Drawing View Property dialog box) to specify whether the ribs and rib-like features created with the Rib, Mounting Boss, Web Network, or Pattern commands are cut and hatched or not hatched.
When you choose the no hatching option, then you also can use the Override Rib Hatching dialog box to selectively identify individual ribs for display using the hatch style. See the Help topic, Set rib hatching in section views.
Many drawing standards call for cut ribs not to display with hatching in section views. You can set a file preference to honor this on the Drawing Standards tab (Solid Edge Options dialog box).
Hatching on partially visible cut faces is controlled by the Process partially hidden cut faces setting on the Advanced tab in the Drawing View Properties dialog. When you set this option and update the section view, any hatching on partially visible hidden cut faces is reprocessed. This can eliminate the need to remove excess hatching using the Draw in View command.
You can simplify a section or broken-out section drawing view so that the area exposed by the cutting plane is easier to see. Use the Set Drawing View Display Depth command on the drawing view shortcut menu to set the visible display depth beyond which all model geometry will be removed by a back clipping plane.
You can use the Cut hardware check box on the Display tab (Drawing View Properties dialog box) to specify whether hardware parts--such as nuts, bolts, and washers--are cut when intersected by the cutting plane in section views.
When the cut is along the axis of a hole shown in a paper-thin section drawing view, you can use the Show threads in Section Only section views option on the Annotation tab (Drawing View Properties dialog box) to display hole threads.
Note:
You can create internal threaded holes in the model when you use the Hole command and set the Type to Threaded on the Hole Options dialog box.
To learn about creating threaded holes in the model, see Threaded features.


