Application Display
Automatic Selection
Specifies that Solid Edge should automatically select the best graphics card option upon startup. Solid Edge delivers a file named AutoConfigure.txt to the Solid Edge Program folder. When the Automatic Selection option is set, Solid Edge uses the information in the AutoConfigure.txt file to build the list of display options available.
For example, suppose the default setting in the AutoConfigure.txt file for your installed graphics card is Graphics Card (Advanced). When the Automatic Selection option is set, the Application Display setting is automatically set to the Graphics Card (Advanced) option.
You can also manually change the Application Display setting by clearing the Automatic Selection option.
Application Display Options
Graphics Card Driven (Advanced)
Graphics Card Driven (Basic)
Graphics Card Driven (Direct3D)
Backing Store
Software Driven
Use Display Lists
Specifies that all graphics cards that are configured for Graphics Card (Advanced) uses display lists. A display list is an OpenGL(r) capability that allows the CAD application to load geometry to the graphics card memory. This off-loads that data from the system memory. Using the dedicated resource on the graphics card is much faster than using shared system memory.
To learn more about these options, see Optimizing Solid Edge Display Performance.
View Transition
Specifies how Solid Edge switches from one view orientation to another. When you set this option, Solid Edge computes several intermediate frames between the first and second orientations to produce the visual effect of flying through the model. You can adjust the speed of the transition between the two orientations to accommodate slower and faster display configurations to suit your personal preference. This option can give you a better understanding of the relationships between orientations and ensures that you select the appropriate view for your work.
3D Input Device
Specifies that you want to check for 3D devices such as a space ball or space mouse. This option activates when you open a new window or close and re-open the file.
Culling
This is active only in dynamic view manipulations and instructs the display system to ignore display requests for certain objects if it detects that the display is taking an excessive amount of time.
Objects are dropped from display based upon several factors including the time since the start of the display of the current frame, the range of the object with respect to the zoom level of the view, and the maximum allowable rejection ratio.
The maximum allowable rejection ratio defines the ratio of an object's range to the view volume and is controlled by the culling slider. The default value on the slider is 50%, which means an object that is larger than 50% of the size of the view volume's maximum dimension (width, height, or depth) is rejected, regardless of the amount of time required to update the view. The slider ranges from 0%, where nothing is rejected, to 100%, where all objects may be rejected. To prevent the discarding of relatively large objects with respect to the zoom level of the view, you should move the slider to the left. To discard larger objects with respect to the zoom level of the view, you should move the slider to the right.
Because culling is highly dependent on the assembly structure, assemblies made of mostly small parts may require that the slider be set toward the far left and assemblies made up of mostly large parts set toward the right.
Moving the slider to the left decreases the desired performance and moving the slider to the right increases the desired performance. Solid Edge attempts to maintain a consistent frame rate by dropping objects from the display. Objects that are small relative to the current zoom level are dropped first and progressively larger objects are dropped until it is determined that the desired performance cannot be satisfied. At that point no other objects are considered for display.
The behavior of this slider has been changed in a previous version to provide more control over the dynamic rotation performance. Prior to the change, the slider controlled the relative size of objects that could be culled which provide very little control over the relative performance of dynamic view manipulations.
OrientXpres Size
Defines the size of the OrientXpres tool.
Refresh Scale
Controls the speed and precision of the magnification commands includuing Zoom Area, Zoom, and Fit. The control only applies to non-rendered viewing modes such as wireframe and outline. The value indicates the scale factor to which you can zoom in before the geometry display refreshes. For example, a value of 3 means the model must be zoomed in beyond 3x before the geometry refreshes. Lower values give greater precision with decreased speed, while higher values give less precision with increased speed. You can press the F5 key at any time for display of the part geometry.
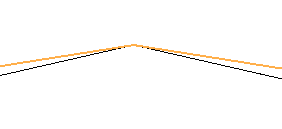
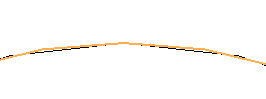
Arc Smoothness
Specifies the minimum number of lines that represent an arc.
Low values (a lower number of lines) make the display coarser. Consequently, low values make the display refresh faster and decrease the memory required for display lists.
High values (a higher number of lines) make the display smoother. Consequently, high values make the display refresh slower and increase the memory required for display lists.
Auto Sharpen
Provides explicit control of the arc /chord deviation defining an arc or circle. A large deviation results in an unappealing display of arcs or circular shapes. This setting is stored as a user preference at the file level.
Off: the deviation is large (low level of detail). This is the default setting for new Solid Edge files.
Note:
This provides the fastest processing.
Low: the deviation is smaller with an increased level of detail- best when loading large assemblies.
Standard: the deviation is smaller than Low.
Note:
This provides the best quality, but increases processing time.
High: the deviation is smallest (high level of detail).
Show Orientation Triad
Displays the orientation triad in the bottom-left corner of the graphic window. The orientation triad shows the current orientation of the view X, Y, and Z axes. This is useful when rotating views and measuring distances between elements or parts.

Use Shading on Constructions
Determines whether construction surfaces display as shaded when you shade the window. When you clear this option, construction surfaces display as wirefame when you shade the window.
Process Hidden Edges During View Operations
Specifies that hidden edges are processed when you dynamically change the view using the view manipulation commands, such as Zoom, Zoom Area, Pan, Fit, and Rotate. Setting this option specifies that the edges of the model are processed to determine whether the edges are visible, hidden, or silhouette edges.
Processing edges during dynamic view manipulations can negatively impact interactive performance when working with complex parts or large assemblies. Clearing this option can improve interactive performance during view manipulations, as when dynamically rotating a view.
When the Visible and Hidden Edges option is set, this option determines whether visible, hidden, or display silhouette edges are calculated and displayed during a dynamic view manipulation. When this option is cleared, all the model edges are displayed as wireframe edges, and silhouette are not calculated. When the dynamic view manipulation is completed, the edges are processed.
When the Shaded with Visible Edges option is set, this option determines whether visible and silhouette edges are displayed during a view manipulation. When this option is cleared, only the shaded faces of the model are displayed.
For more information on working with large assemblies, see the Working with large assemblies efficiently Help topic.
Display drop shadows during view operations
Specifies that drop shadows, if turned on in the Format View command, are displayed during view manipulations- such as zoom, rotation, and dynamic pan.
Display Inter-Part copies as constructions
Specifies that inter-part copies of a part are displayed in an assembly using the construction color. When this option is cleared, inter-part copies for a part cannot be displayed in an assembly. When this option is set, you can display the inter-part copies of a part in an assembly using the Show Component Construction Surfaces command.
Use Shading on Reference Planes
Determines whether reference planes display as shaded when you shade the window. When you clear this option, reference planes display as wirefame when you shade the window.
Opacity
Sets the opacity for reference planes when the window is shaded.
Use Shading on Selection
Determines if faces and features are shaded when you select them with the mouse cursor. The option is only available when you set the Application Display to Graphics Card Driven.
Glow
If the Use Shading on Selection option is selected, the slider controls the amount of glow that is displayed in the Graphics Card Advanced application display setting. Setting the value to 0 disables glow, while the options 1, 2, or 3 increases the amount of glow.
Dim Surrounding Assembly When In-Place Activated
Determines whether the surrounding components are dimmed and translucent when you in-place activate a part or subassembly and work within a shaded window.
When you set this option, you can also use the Opacity slider to control the translucency of the surrounding components. This option can make it easier to visualize the assembly component you in-place activated.
Opacity
Sets the opacity (darkness) of the surrounding parts when the window is shaded.
Show Triangulation Bend Lines for Lofted Flanges
Specifies that the triangulation bend lines are displayed for lofted flanges.
Clipping Planes
Sets the options for the display and behavior of clipping planes. You can use the Set Clipping Planes command to define a narrow display region of a part or assembly to make it easier to complete a task.
Dynamic Clipping
Dynamically clips the display of the part or assembly when defining the display depths for the active window. When working with a complex part or assembly, clearing this option improves performance. You can also specify whether the display is dynamically clipped using the Dynamic Clipping button on the Set Clipping Planes command bar.
Plane 1
Sets the color for the first clipping plane when the window is shaded. You can select a color from the list.
Opacity
Sets the opacity (darkness) for the first clipping plane when the window is shaded.
Plane 2
Sets the color for the second clipping plane when the window is shaded. You can select a color from the list.
Opacity
Sets the opacity (darkness) for the second clipping plane when the window is shaded.
Feature Preview
Sets the options for dynamic extent during feature creation.
Dynamically Preview Feature Creation
Specifies that the feature is dynamically displayed during the Extent step of feature creation.
Result
Controls the color for the resulting feature.

Note:
When working with an assembly, only the Tool Body is shown during feature creation.
Tool Body
Controls the color of a cutout when it is not intersecting model geometry. Once the cutout intersects the model, the portion of the model being removed changes to the result color.
Opacity
Sets the opacity (darkness) of the tool body.