Solid Edge contains commands that work together to help you manage part colors and styles.
The Color Manager command provides settings that allow you to manage your color display modes. You can set the display mode to use the colors defined on the Colors tab on the Options dialog box or you can set the display mode to use the colors of the individual parts. In the Assembly environment, the Show and Allow Assembly Style Override option is available to allow you to override part styles.
The Part Painter command allows you to apply styles to part faces, features, reference planes, sketches, coordinate systems, and construction elements. The Part Painter command is only available when you set the Use Individual Part Styles option on the Color Manager dialog box. The Part Painter command allows you to easily apply override styles to the base styles that are defined in the Color Manager dialog box.
In the Assembly environment, Color Manager is set, by default, to use the colors defined by the Options dialog box. You can change these colors with the Options command. To access the Colors tab on the Options dialog box from the Color Manager dialog box, click the Change button.
If you do not want to display all parts in the same color, on the Color Manager dialog box set the Use Individual Part Styles option. You can then override the style definition for the individual parts in the assembly with an assembly style definition without changing the part-level style definition. The Color Manager dialog box also allows you toggle the display of face styles on and off. You can also apply unique colors, textures, and so forth to the parts with the Faces Style option on the Select command bar.
You can make face style assignments to any part at any level in the assembly. You do not have to in-place activate a part or subassembly to apply color overrides. You can multi-select parts and subassemblies graphically or through Assembly PathFinder. If you override the style for a subassembly, the new style is assigned to each part occurrence, including the parts in lower level subassemblies.
You can apply assembly style overrides at or below the highest level within a nested assembly structure. The assembly color overrides are stored in the top-level assembly. If you in-place activate into a subassembly, the subassembly will always show the colors that are stored at the top-level assembly. If you open the subassembly outside of the context of parent assembly, it becomes the top-most assembly and any assembly overrides are stored in it. However, when you reopen the parent assembly, the color overrides that were applied at the subassembly level are not rolled into the parent assembly. When you place a subassembly into an assembly, the top-level assembly reads any style overrides for the subassembly and saves any override definitions that have been applied at the top level.
The style override applies to the whole part. For example, if you apply an assembly override to a multi-colored part, the specified color override applies to the whole part. Multiple part occurrences at the assembly level can have different assembly overrides. You can specify whether the override applies to all occurrences of the part or to individual occurrences.
After you have applied individual colors to the parts in your assembly, you can use the Color Manager command to control whether the individual colors are displayed or whether all parts are displayed using the same color.
In the Part environment, Color Manager is set, by default, to use the individual part colors. You can select a base style for parts, construction elements, and threaded cylinders.
The Show and Allow Assembly Style Override option is not available in the Part environment. You can set the display mode to use the colors defined on the Colors tab on the Options dialog box or you can set the display mode to use the colors of the individual parts. The Copy Individual Face Colors option is available to allow styles that have been applied to individual part faces to be copied when the feature is copied and pasted, smart patterned, smart mirrored, or copied to a feature library. These styles cannot be copied if the feature is fast patterned or fast mirrored.
When you set the Use Individual Part Styles option on the color Manager dialog box, the Part Painter command becomes available. This command allows you to apply style overrides to individual features and faces.
The Part Painter command allows you to apply style overrides to the:
all top-level objects that support styles
features of the part, including construction surfaces
all features of the part
all features of the same type on a part
bodies of the part
faces of the part
The Part Painter command allows you to apply or remove overrides to multiple faces, features, bodies, sketches, coordinate systems, reference planes, and construction surfaces. When you remove a style override, the selected element returns to the base style.
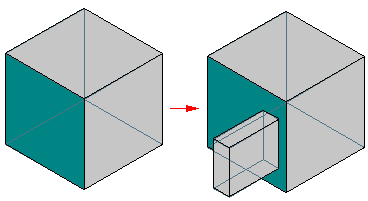
If you apply a face style to an individual face and then split that face, the resulting faces inherit the face style that is currently applied to the face.
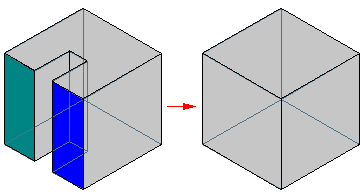
If you merge two individual faces that have separate face styles, the new faces reverts back to the base part style.
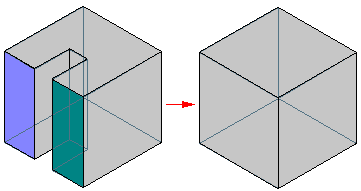
If faces that result from a split face have two different styles are rolled back to the point before the split, the single face returns to the base part style.
If you add a feature to an existing feature that has an individual face style override, the new feature carries the base part style. It does not inherit the style of the parent feature.
In the Simplified mode in the Part environment, the part reverts back to the base part color and style. You can add colors, but these colors will only display while you are in the Simplified mode. Within the Simplified mode, the Part Painter command only applies to the faces.
In the Flat mode in the Sheet Metal environment, the part reverts back to the base part color and style. You can add colors, but these colors will only display while you are in the Flat mode.
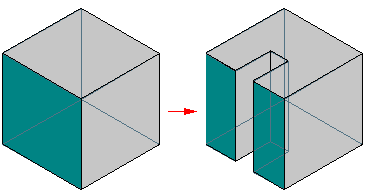
If you place a cutout in the Assembly environment, the faces on the cutout inherit the base part color that is defined in the individual part files.
The Part Painter command only applies to the parts, features, and construction surfaces that are in the file when the command is executed. It does not provide default styles for future parts, features, and construction surfaces.
When you switch the view style from shaded to wireframe, parts display with the individual face color assignments. However, when the part is dynamically rotated, the individual face colors revert back during the rotation. Once the rotate operation is complete, the part will return to the individual face styles.
Static previews will display parts with the styles that were saved with the part or assembly.
A part copy that is inserted as a base feature takes on the base part color. It does not use the part color of the parent.
Fast patterns, fast mirror features, and mirrored body features that have multiple colors and styles only carry over an "all-over" feature override. The features do not carry over individual face colors.
If a rollback occurs, the Part Painter command only acts on the faces and features that are currently available. If a roll forward occurs the colors and styles that were applied are maintained.
The Part Painter command does not work on suppressed features.
If an individual face color is removed, the face reverts to the base color, not the feature color.